Budget Astrophotography Mastery: How to Photograph the Milky Way Without Expensive Gear
Learn how to capture stunning Milky Way photos using affordable gear. This comprehensive guide covers camera settings, composition, planning, and editing—perfect for beginners and budget photographers.
HOBBYLIFESTYLEPHOTOGRAPHYHOW-TO
2/26/20258 min read

How to Photograph the Milky Way Without Expensive Gear
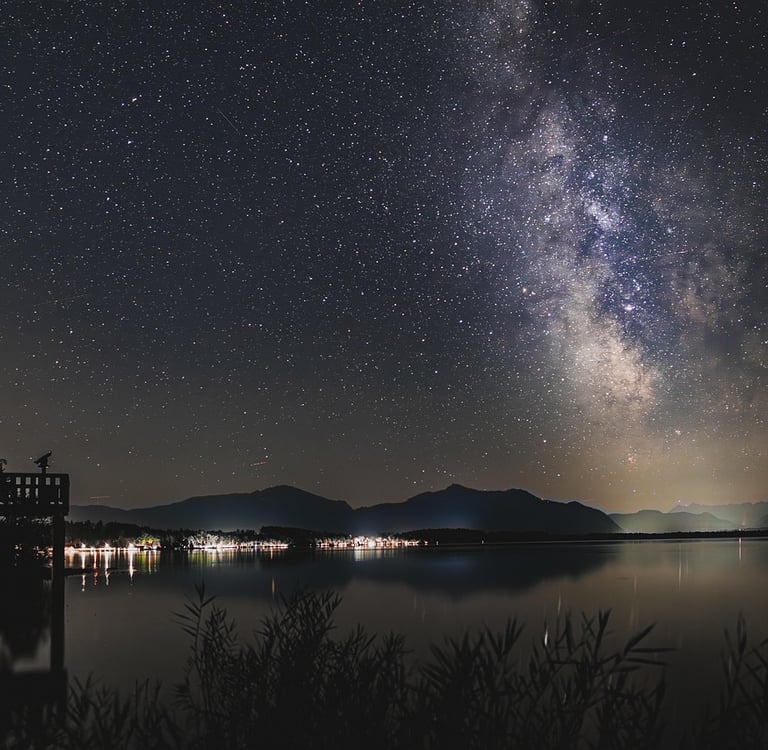
There’s something magical about the Milky Way—the glowing band of countless stars stretching across the night sky, a reminder of our place in the vast cosmos. For many photography enthusiasts, capturing the Milky Way feels like an expensive dream reserved for those with high-end cameras and exotic lenses. But what if you could do it with the gear you already have—or on a modest budget?
Astrophotography doesn’t have to break the bank. With patience, knowledge, and the right techniques, you can create breathtaking Milky Way images using entry-level gear or even your smartphone. This guide will show you how to photograph the Milky Way without expensive equipment—focusing on preparation, camera settings, composition, and post-processing techniques.
1. Understanding the Milky Way and Why It’s Worth Capturing
Before we dive into the technical details, it’s worth understanding why photographing the Milky Way is so rewarding. The Milky Way is our galaxy—home to billions of stars, planets, and cosmic wonders. When you capture it on camera, you’re freezing a glimpse of the universe itself.
Milky Way photography blends science, art, and patience. It requires you to connect with nature, escape light pollution, and understand how the Earth’s rotation affects what you see in the night sky.
What makes it beautiful is that the Milky Way is accessible. You don’t need to travel across the world—just to a dark sky location with clear weather and a bit of technical understanding.
With a simple tripod, a camera with manual controls, and some dedication, you can create images that rival professional shots.
2. Planning Your Shoot: When and Where to Photograph the Milky Way
Planning is the foundation of successful astrophotography. You can’t just step outside and expect to see the Milky Way—it’s visible only at certain times and locations.
A. Timing: When Is the Milky Way Visible?
The Milky Way’s core—the bright, detailed center of our galaxy—is visible primarily between March and October in the Northern Hemisphere. The best viewing months are May to August, depending on your location.
To see it clearly, you must shoot on a moonless night when the sky is at its darkest.
In simple terms, the perfect conditions are:
New Moon (or close to it)
Clear skies with minimal clouds
Between midnight and 4 AM, when the Milky Way’s core is above the horizon
Low humidity, to avoid haze or lens fog
You can use free apps like:
Stellarium – for sky simulation and Milky Way positioning
PhotoPills – to plan the Milky Way’s rise and orientation
Clear Outside – for cloud coverage and light pollution forecasts
B. Location: Escaping Light Pollution
Light pollution is the biggest enemy of astrophotography. City lights wash out stars and make it nearly impossible to capture the galaxy’s core.
To find dark skies:
Use the Dark Site Finder or Light Pollution Map websites to locate dark zones (Bortle scale 1–3).
Head at least 30–50 miles away from a city.
National parks, mountains, or remote beaches make great spots.
As a rule of thumb, the darker your surroundings, the more stars your camera will capture.
3. Essential Budget-Friendly Gear You Need
You don’t need a £3000 camera to photograph the Milky Way. You can start with basic or used gear and still achieve excellent results.
A. Camera
You need a camera that allows manual control of ISO, shutter speed, and aperture.
Options include:
DSLRs: Entry-level models like Canon EOS Rebel T7 or Nikon D3500.
Mirrorless cameras: Sony A6000, Canon M50, or Fujifilm X-T30.
Even smartphones: Newer phones (like Google Pixel, Samsung Galaxy S series, or iPhones) with “Night Mode” can capture the Milky Way surprisingly well when stabilized.
The key is manual control and RAW shooting capability, not price.
B. Lens
A wide-angle lens (14mm–24mm) is ideal because it captures more of the sky.
For budget users:
Try the Rokinon/Samyang 14mm f/2.8 (cheap and sharp).
Or use your kit lens—just zoom out fully (e.g., 18mm) and open the aperture as wide as possible.
C. Tripod
Even a basic sturdy tripod is non-negotiable.
It keeps your camera stable during long exposures. Affordable brands like Neewer, K&F Concept, or AmazonBasics have solid options.
D. Remote Shutter or Timer
Avoid touching your camera when taking the shot—use a remote shutter release or the 2-second timer feature to prevent vibrations.
E. Optional Accessories
Headlamp or flashlight (preferably with red light mode)
Extra batteries (long exposures drain power fast)
Lens heater or hand warmers (to prevent lens fog)
In short: a camera with manual controls, a sturdy tripod, and a clear sky are enough to get started.
4. Mastering Camera Settings for Milky Way Photography
Now that you have your gear and location ready, it’s time to master your settings. These determine how much light your camera captures—and whether your stars appear crisp or blurry.
A. Aperture
Set your lens to its widest aperture (the smallest f-number, e.g., f/2.8 or f/3.5).
This lets in maximum light, crucial for dark skies.
B. Shutter Speed
Too short, and your photo will be dark. Too long, and stars will trail due to Earth’s rotation.
To find the ideal shutter speed, use the “500 Rule”:
Shutter Speed (in seconds) = 500 ÷ Focal Length (full-frame equivalent)
For example:
18mm lens → 500 ÷ 18 = ~27 seconds
24mm lens → 500 ÷ 24 = ~20 seconds
If you’re using a crop-sensor camera, multiply your focal length by the crop factor (1.5 or 1.6).
C. ISO
ISO controls how sensitive your sensor is to light.
Start with ISO 1600–3200, and adjust based on your camera’s noise performance.
Higher ISO = more brightness but also more digital noise.
Balancing is key—don’t go too high if your camera can’t handle it.
D. Focus
Autofocus fails in low light, so manual focus is essential.
Switch your lens to manual focus.
Use Live View and zoom in on a bright star.
Adjust until the star appears as a tiny, sharp point.
Lock the focus using tape if needed.
E. White Balance
Set white balance to 3500–4000K (Kelvin) for natural star colors.
You can fine-tune later when editing RAW images.
In a sentence, your starting settings should be: f/2.8 aperture, 20–25 seconds shutter speed, ISO 3200, 3500K white balance, manual focus on a bright star.
5. Composition: Making Your Milky Way Image Stand Out
Even with perfect settings, composition gives your photo soul. The Milky Way alone can look flat unless you combine it with an interesting foreground.
A. Include a Foreground Element
Think of silhouettes—trees, rocks, buildings, or even yourself gazing at the sky.
This creates depth and storytelling.
B. Use the Rule of Thirds
Place the Milky Way along one-third of the frame for balance.
If it’s arcing, position it diagonally across the image for visual movement.
C. Experiment with Angles
Crouch low, tilt up, or include reflections in water.
Small changes in perspective can dramatically enhance the result.
D. Light Painting (Optional)
Briefly illuminate the foreground with a flashlight during the exposure.
A quick one-second sweep is enough to bring subtle details to life.
In short, treat the Milky Way as part of your scene—not the entire story.
6. Shooting Techniques: Step-by-Step Guide
Let’s bring everything together in a simple sequence.
Arrive early – before sunset, to set up your tripod and test compositions.
Check your focus – lock onto a bright star or distant light.
Set your camera settings – use your base settings (e.g., f/2.8, 25s, ISO 3200).
Use manual mode – no auto settings; you’re in full control.
Turn off image stabilization – unnecessary on a tripod.
Take test shots – check for exposure, sharpness, and framing.
Refine settings – adjust ISO or shutter speed if too dark or bright.
Capture multiple shots – for stacking or noise reduction later.
Avoid lens fog – use a heater or wipe with a microfiber cloth.
Enjoy the moment – look up and appreciate the stars.
In sentence form:
Arrive early to set up, focus manually on a star, use full manual mode with wide aperture and long exposure, turn off stabilization, take test shots to refine brightness, capture multiple frames, and ensure your lens stays fog-free.
7. Editing Your Milky Way Photos (Without Expensive Software)
Post-processing brings your image to life, revealing the true detail of the Milky Way.
A. Free and Affordable Editing Tools
You don’t need Photoshop. Try:
Darktable (free, open-source alternative to Lightroom)
Lightroom Mobile (free basic version on smartphones)
Snapseed (for mobile editing)
GIMP (for desktop editing)
B. Basic Editing Workflow
Adjust Exposure: Brighten the overall image carefully.
Enhance Contrast: Increase clarity to define the Milky Way’s structure.
Reduce Noise: Use noise reduction tools sparingly.
Adjust White Balance: Aim for cool tones (around 3800K).
Boost Highlights and Blacks: Accentuate stars while keeping shadows realistic.
Sharpen Details: Apply mild sharpening to highlight star definition.
Vignette: Add a subtle vignette to draw attention to the Milky Way’s core.
C. Stacking for Noise Reduction
If you took multiple shots of the same composition, use free software like Sequator (Windows) or Starry Landscape Stacker (Mac) to merge them.
Stacking averages out noise and enhances detail—especially useful for budget cameras.
8. Smartphone Astrophotography: Yes, It’s Possible!
Modern smartphones can do wonders.
If you don’t have a DSLR or mirrorless camera, don’t worry—you can still photograph the Milky Way with your phone.
A. Using Night Mode
Phones like the Google Pixel, Samsung Galaxy, or iPhone 14 Pro have “Night Mode” or “Astro Mode.”
Place your phone on a tripod, aim at the Milky Way, and let it capture a long exposure automatically.
B. Manual Camera Apps
Download apps like:
ProCam X (Android)
Halide (iOS)
Camera FV-5
Set:
ISO 1600–3200
Shutter speed: 15–20 seconds
Focus: Infinity
White balance: 3500–4000K
C. Add-on Lenses
Attach a clip-on wide-angle lens to expand your field of view—affordable and effective for smartphones.
With patience, phone astrophotography can produce stunning Milky Way results, especially in dark skies.
9. Common Problems and How to Solve Them
Even experienced photographers face challenges when shooting the Milky Way. Here’s how to troubleshoot common issues:
If your stars look blurry, it’s likely due to poor focus or tripod movement—use manual focus and ensure your tripod is stable.
If your photo is too noisy, your ISO might be too high—stack multiple exposures or apply noise reduction in editing.
If the image looks too bright or washed out, the shutter speed is too long—shorten the exposure or lower the ISO.
If there’s a glow from city lights, you’re too close to an urban area—move to a darker location or use a light pollution filter.
If your lens fogs up, condensation is the culprit—use a lens warmer or hand warmers.
10. Practicing and Improving Over Time
Like any art form, astrophotography takes practice.
Each session teaches you something new about light, focus, and timing.
A. Start Simple
Begin with your current gear. Learn how the night sky behaves through your lens.
Experiment with different ISO and shutter settings until you understand your camera’s limits.
B. Review and Learn
Analyze your shots the next day:
Are stars sharp?
Is the Milky Way positioned well?
Is there too much noise or blur?
C. Keep a Shooting Log
Document your settings, weather, and results. Over time, patterns emerge that help you improve.
D. Learn from Others
Join online communities like Reddit’s r/Astrophotography, or local astronomy clubs.
Seeing others’ work will inspire you to refine your own.
E. Upgrade Slowly
Once you’ve mastered technique, you’ll know exactly what gear upgrade will make the most difference—usually the lens, not the camera.
Patience and consistency matter far more than money spent.
11. Ethical and Environmental Considerations
When heading into nature at night, remember:
Respect wildlife: Avoid bright lights or loud noises.
Leave no trace: Take all your equipment and rubbish with you.
Stay safe: Inform someone where you’re going, especially in remote areas.
Preserve dark skies: Support initiatives that reduce light pollution.
Astrophotography connects you to nature—protect it as you capture it.
Conclusion: You Don’t Need Expensive Gear to Capture the Universe
The night sky doesn’t discriminate. Whether you have a top-tier camera or a simple setup, the stars shine for everyone.
With basic gear, good planning, and smart technique, you can photograph the Milky Way in all its glory.
Astrophotography is about curiosity, patience, and connection.
When you stand under the stars, you’re reminded of something bigger than yourself—and the beauty of that moment is what your camera will capture.
So grab your tripod, step into the night, and start shooting. The Milky Way is waiting.
Disclaimer:
This article is for educational and informational purposes only. Always check local regulations before visiting remote areas for night photography. The author and publisher are not responsible for any damages, injuries, or losses incurred while attempting the methods described. Practice responsible and safe photography at all times.