How to Choose the Perfect Foreground for Star Trails: Turning Night Skies into Captivating Compositions
Discover how to choose the perfect foreground for star trail photography. Learn expert tips on composition, lighting, and subject placement to create breathtaking night sky images that tell a story and captivate viewers.
HOBBYLIFESTYLEPHOTOGRAPHYHOW-TO
5/14/20259 min read
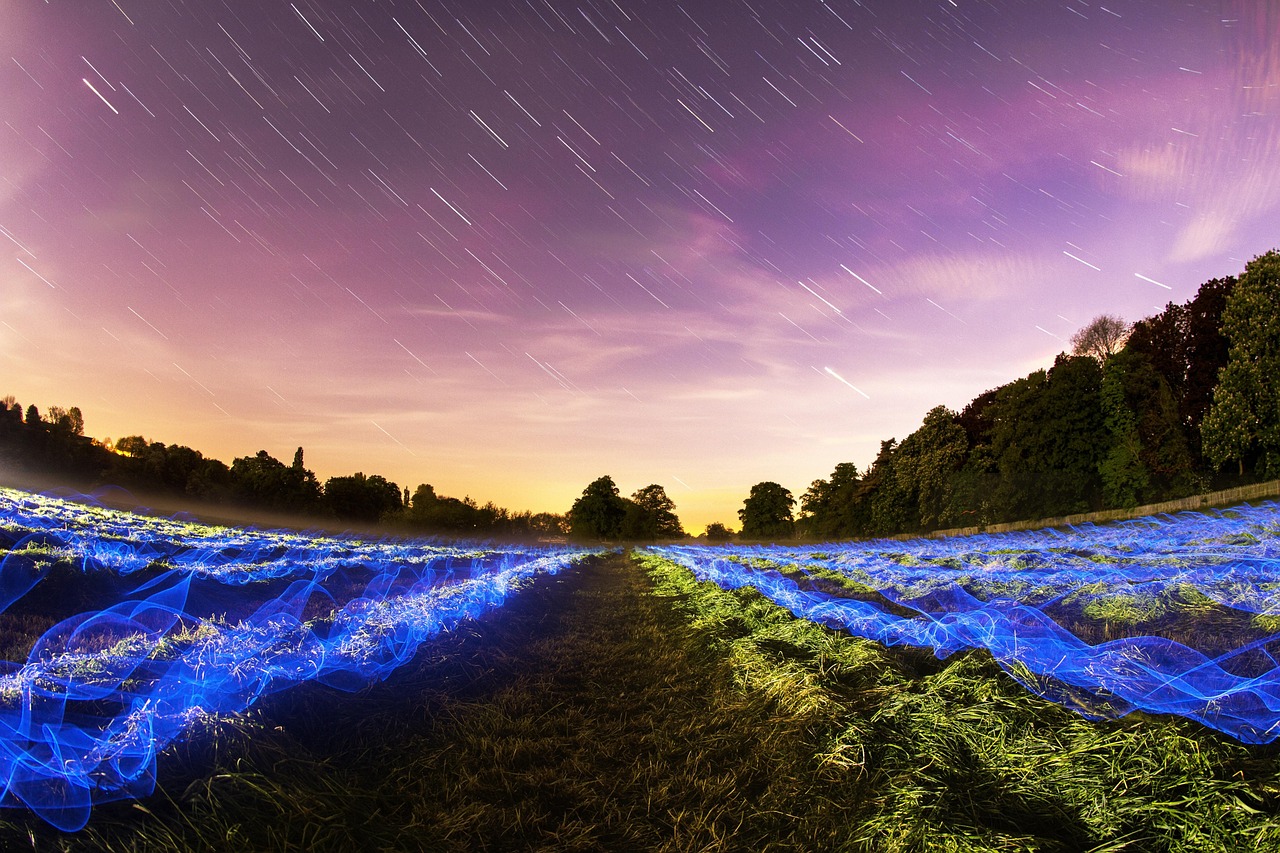
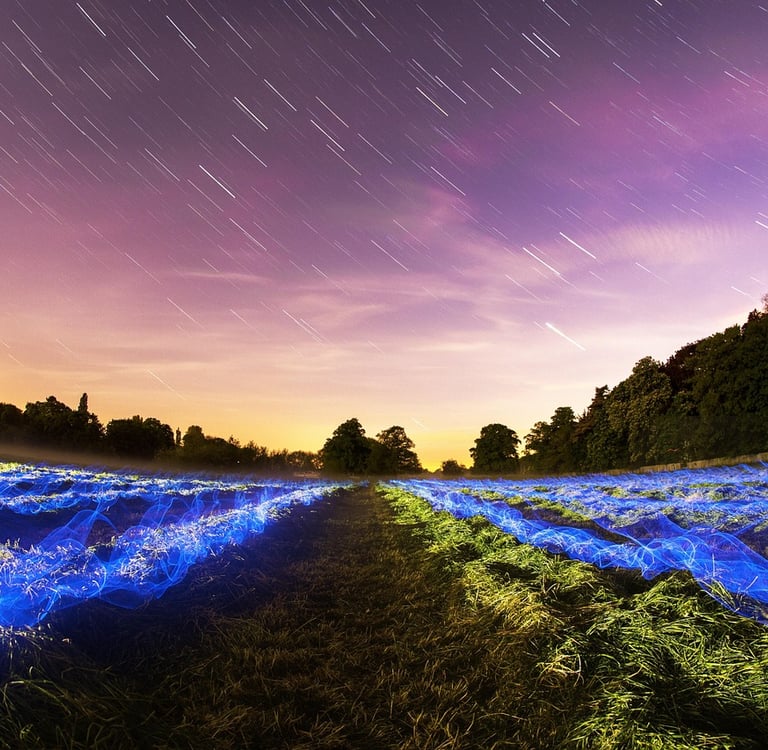
Star trail photography is one of the most awe-inspiring forms of night sky photography, capturing the Earth’s rotation through long exposures that transform stars into luminous circular paths. But while many photographers focus on the trails themselves, what truly elevates a star trail image is the foreground. A well-chosen foreground adds scale, depth, and narrative to your shot — turning a beautiful image of stars into a breathtaking story of connection between Earth and sky.
In this guide, you’ll learn everything about choosing the perfect foreground for star trails, from composition techniques and subject ideas to lighting strategies and location planning. Whether you’re a beginner trying to capture your first star trails or a seasoned astrophotographer seeking to refine your creative style, this comprehensive guide will help you create stunning images that balance technical mastery with artistic vision.
1. Understanding the Importance of Foreground in Star Trail Photography
The foreground is what grounds your celestial composition. Without it, your image risks feeling flat or disconnected from reality. Think of it as your anchor — a bridge that connects viewers to the infinite motion of the stars.
In star trail photography, the sky delivers drama, but the foreground delivers emotion. It gives your image a sense of place, scale, and depth, transforming it from a simple sky capture into a story. The viewer’s eye naturally starts with the earthly element before traveling upward into the cosmic swirl of light.
A compelling foreground helps you:
Establish context — showing where the photo was taken.
Create depth and perspective — using layers that lead the viewer’s eye through the frame.
Enhance composition balance — anchoring the swirling trails against solid visual weight.
Convey emotion or narrative — whether it’s solitude, mystery, adventure, or wonder.
When you blend the vastness of the cosmos with the grounded beauty of Earth, your image becomes not just a technical feat but a piece of art that tells a story.
2. The Relationship Between Sky and Ground
Star trail photography is unique because it captures two simultaneous motions — the static and the dynamic. The sky moves, but the Earth remains still in your frame. The key to a strong composition is finding harmony between these two realms.
Your goal is to ensure that the foreground complements the star trails rather than competing with them. For example, a massive mountain might add grandeur, but if it’s too dominant or dark, it could overshadow the celestial element. Similarly, a minimalistic landscape can emphasize the trails but might lack emotional depth if it’s too empty.
To achieve balance:
Think of your composition in layers — background (sky), midground (horizon or mountains), and foreground (subject).
Use leading lines like roads or rivers that point toward the sky’s center of rotation.
Align your composition with Polaris (the North Star) in the Northern Hemisphere or the Southern Celestial Pole in the Southern Hemisphere to create circular symmetry.
The foreground should enhance the celestial dance, not overpower or distract from it.
3. Planning Your Location and Foreground Elements
Selecting the right location is the first step toward choosing the perfect foreground. The ideal spot will offer an unobstructed view of the sky, minimal light pollution, and interesting foreground subjects.
When scouting:
Check light pollution maps – Use tools like Light Pollution Map or Dark Site Finder to find dark-sky areas.
Research landscapes – National parks, coastal cliffs, lakes, and desert areas often make for excellent foregrounds.
Use apps like PhotoPills or Stellarium to plan where the celestial pole will be in relation to your chosen landscape.
Pre-visit during the day – This helps you safely find compositions and foreground structures that look compelling under starlight.
Consider safety and accessibility – Remote areas can be stunning but ensure you can access them safely at night.
In essence, your location determines your creative potential. If your surroundings offer variety — trees, rocks, ruins, water bodies, or silhouettes — you’ll have a wealth of foreground options to experiment with.
4. What Makes a Great Foreground Subject for Star Trails
Not every object or landscape works well under star trails. The most compelling foregrounds share three qualities: shape, texture, and storytelling potential.
Here are popular choices:
Mountains and Hills — Provide grandeur and contrast against the sky. Ideal for symmetry or silhouetted compositions.
Lakes or Rivers — Offer reflections that double the beauty of the trails.
Trees — Add organic patterns and depth; dead trees often look striking against swirling stars.
Man-made Structures — Abandoned barns, windmills, ruins, or observatories can tell human stories amidst cosmic vastness.
Rocks and Boulders — Create visual anchors and foreground texture, enhancing the sense of depth.
Vehicles or Tents — Perfect for adventure-themed star trails, adding a touch of warmth and human presence.
Monuments or Statues — Can symbolize history, endurance, or solitude against the timelessness of the sky.
Think about what emotion you want your image to evoke — mystery, peace, wonder, or exploration — and choose a subject that aligns with that mood.
5. Composition Principles for Foreground Placement
Once you have your subject, the next step is to compose it within the frame. Star trail photography demands thoughtful composition since the exposure lasts for hours, and repositioning mid-shoot is often impractical.
Follow these key composition rules:
Rule of Thirds — Place the horizon or key subject along one of the thirds for visual balance.
Leading Lines — Use paths, fences, or rivers to draw the viewer’s eye from the foreground to the sky.
Framing — Natural arches or overhanging trees can create frames that focus attention on the trails.
Symmetry — Center the composition when using reflective surfaces or when photographing Polaris directly.
Foreground Interest — Include an element with distinct shape or texture in the immediate foreground to add depth.
In a sentence: Good composition combines balance, harmony, and intentional direction between foreground and sky — ensuring the viewer’s gaze moves naturally through the frame.
6. Using Depth and Scale to Strengthen the Scene
Foreground elements not only add interest but also define scale. Without them, the viewer loses spatial reference and the trails may seem abstract. By including a recognizable object — a tree, tent, or rock — you help the audience grasp how vast the sky truly is.
To enhance depth:
Place objects at different distances (foreground, midground, and background).
Use a wide-angle lens (14–24mm) to exaggerate spatial relationships.
Get close to your foreground subject for a dramatic perspective.
Include a human element (a silhouette or figure) to give scale and storytelling impact.
This layering technique makes your photo immersive, drawing viewers into the environment rather than merely showing them the stars.
7. Lighting the Foreground
Lighting plays a crucial role in how your foreground interacts with the night sky. While star trails require long exposures, the foreground must be illuminated carefully to avoid overexposure or artificial glare.
Foreground Lighting Techniques:
Natural Ambient Light – Use moonlight or twilight for gentle, even illumination. A partial moon (25–50%) can beautifully light the landscape while still preserving star visibility.
Light Painting – Use a flashlight or LED panel to selectively light parts of the foreground during the exposure.
Continuous Low-Level Lighting – Place a dim, constant light source (like a lantern or small panel) to softly illuminate the scene.
Reflected Light – Use reflective surfaces such as snow or sand that naturally bounce starlight or moonlight.
Be subtle — the goal is to complement, not overpower, the celestial patterns. If your lighting feels unnatural, reduce its intensity or adjust its direction.
8. Color Harmony Between Foreground and Sky
Color plays a vital role in storytelling and mood. In night photography, tones are often muted, but you can still craft harmony between earth and sky through intentional choices.
Warm vs. Cool Balance: Warm tones in the foreground (from artificial or moonlight) contrast beautifully with the cool blues of the night sky.
Reflections: Water surfaces can capture subtle colors from the stars or surrounding lights, adding cohesion.
Post-Processing: You can balance tones during editing to maintain color consistency and avoid unnatural clashes.
When done right, the foreground and sky should look like they belong together, united under the same atmosphere and light story.
9. Working with Silhouettes
Silhouettes are among the most powerful compositional tools in star trail photography. They allow your foreground to have strong shapes without introducing noise or light pollution.
Ideal subjects include trees, mountains, rock arches, or recognizable landmarks. To capture crisp silhouettes:
Keep the light source behind the subject (e.g., from the sky).
Avoid artificial lighting that spills onto the subject.
Expose primarily for the sky so that the subject remains dark but defined.
Silhouettes add mystery and elegance, guiding attention to the interplay between the Earth’s stillness and the sky’s motion.
10. Using Reflections as Foreground Enhancers
Reflections can double your visual impact, making your photo twice as mesmerizing. Lakes, puddles, or even wet sand can mirror the star trails, creating symmetry and depth.
For perfect reflections:
Choose calm water without ripples.
Place the camera low to the ground for a more dramatic reflection angle.
Use a vertical orientation to capture both sky and its mirror.
Avoid over-bright light sources that can blow out highlights in the water.
The mirrored trails evoke tranquility and balance, adding a poetic touch to the composition.
11. Incorporating Human Elements
Including people in your star trail compositions can transform a technical shot into a relatable story. A figure gazing at the sky or sitting near a tent introduces a sense of wonder, scale, and emotion.
To include humans effectively:
Have them remain still during exposure to avoid blur.
Use a short burst of light painting to define their outline.
Place them slightly off-center for composition balance.
Keep exposure low enough that they don’t dominate the frame.
This technique blends adventure photography with astrophotography, appealing to both audiences.
12. Balancing Brightness Between Foreground and Sky
Balancing exposure is one of the trickiest parts of star trail photography. The foreground tends to be much darker than the sky, especially in moonless conditions. To achieve harmony:
Shoot separate exposures – One for the sky (longer exposure) and one for the foreground (shorter, properly exposed).
Blend in post-processing using layer masks for natural transitions.
Use low-level lighting to lift the shadows slightly without overpowering star visibility.
Avoid bright light sources that cause lens flare or overexposure.
In a sentence: The perfect star trail photo balances celestial brightness with earthly detail, ensuring that both feel part of the same magical moment.
13. Foreground and Celestial Alignment
Alignment determines how the star trails interact with your foreground subject. If you want circular trails, position the camera facing north (for Polaris) or south (for the Southern Celestial Pole). If you prefer diagonal or arcing trails, adjust your orientation accordingly.
Example alignments:
Centered Polaris above a tree or tower – Creates symmetry and drama.
Diagonal trails across mountain ridges – Adds motion and energy.
Curved trails above a reflective lake – Doubles visual motion with mirrored arcs.
Use star-tracking apps to preview where the rotation center will appear in your composition before shooting.
14. Common Foreground Mistakes and How to Avoid Them
Every photographer encounters challenges when choosing and managing the foreground for star trails. Awareness helps you overcome them quickly.
In a sentence: Problems like flat lighting, unbalanced compositions, or distracting objects often occur due to rushed planning or poor light control.
Flat lighting often occurs when there’s no directional light source — solve this by using side lighting or natural moonlight to add depth. Harsh shadows result from overly strong artificial light; you can fix this by diffusing your light or moving it farther from the subject. Distracting backgrounds, often caused by clutter or unwanted elements, can be resolved by simplifying the setup and focusing on your main subject. Finally, blurry images typically come from camera shake — always use a sturdy tripod or a remote shutter release to ensure crisp results.
15. Practical Field Workflow for Foreground Selection
Arrive Early – Scout during daylight and test compositions.
Set Up the Tripod Firmly – Prevent vibrations during long exposures.
Choose Your Subject – Look for elements that align with the celestial pole.
Frame with Intention – Check for distractions at the frame edges.
Test Shots – Take short exposures to check composition and focus.
Lock Settings – Once satisfied, begin your star trail sequence.
Monitor the Scene – Watch for unwanted light interference or dew buildup.
Shoot Continuously – Capture hundreds of frames to later stack for trails.
Preparation and patience pay off — star trail photography is as much about endurance as artistry.
16. Post-Processing Tips for Foreground Enhancement
Once you’ve captured your images, post-processing becomes your playground for balancing and refining your composition.
Key Editing Steps:
Stacking: Combine multiple exposures using software like StarStaX or Sequator.
Foreground Blending: Merge a clean foreground frame with your stacked trails for best detail.
Color Balance: Adjust white balance for consistent tones between sky and ground.
Contrast and Shadows: Lift shadow areas gently without introducing noise.
Noise Reduction: Apply selectively — avoid losing texture in the foreground.
Editing allows you to create harmony between your terrestrial and celestial elements — bringing your vision to life.
17. Case Study: Choosing Foreground in Different Terrains
Let’s explore how different terrains influence your foreground decisions:
Desert Landscapes: Use sand dunes or rock formations; the clean horizons highlight circular star trails.
Forests: Look for clearings or silhouetted trees; avoid dense canopies that block the sky.
Coastal Areas: Use cliffs or tidal pools; reflections add magic.
Mountains: Frame peaks under Polaris for symmetry and grandeur.
Urban Outskirts: Include architecture or industrial structures to contrast nature and civilization.
Each environment has unique storytelling potential — adapt your approach based on available textures, light, and accessibility.
18. Creative Foreground Ideas for Artistic Star Trails
If you want your star trails to stand out, experiment with creative approaches:
Use crystal balls or glass domes to reflect the stars in miniature form.
Capture light trails from cars on winding roads beneath star trails.
Combine multiple foregrounds in one composite for surreal effects.
Use motion elements (waves, clouds, fog) for dynamic contrast.
Frame historic ruins or ancient monuments to blend human history with cosmic time.
Creativity in foreground selection distinguishes good photos from unforgettable ones.
Final Thoughts: Connecting Earth and Sky
Choosing the perfect foreground for star trails isn’t just about technical precision — it’s about emotional connection. The foreground tells the human side of your story, grounding infinite celestial motion in a tangible sense of place. When your composition, light, and emotion align, you create not just a photograph, but a timeless dialogue between Earth and the cosmos.
Every successful star trail image reminds us that we’re part of something vast, beautiful, and ever-moving — and that beauty begins with the choice of what stands beneath the stars.
Disclaimer
This article is for educational and creative guidance purposes only. Always ensure you have permission to photograph in private or protected areas and prioritize safety during nighttime shoots. Conditions, visibility, and results may vary based on location, weather, and equipment. The tips provided are meant to enhance your creative process but do not guarantee identical outcomes.