How to Set Up a Simple Still Life Studio at Home: A Complete DIY Guide for Beginners
Learn how to set up a simple still life photography studio at home with minimal equipment. Discover practical lighting tips, backdrop ideas, and composition techniques to create professional-quality still life photos on a budget.
HOBBYLIFESTYLEPHOTOGRAPHYHOW-TO
4/30/20258 min read
Still life photography is one of the most rewarding genres for both beginners and experienced photographers. It allows you to slow down, control every element in your frame, and tell a story using objects, textures, and light. Whether you want to photograph fruit, flowers, glass, or antiques, you can achieve stunning results right from your living room.
In this comprehensive guide, we’ll walk you through everything you need to know about setting up a simple still life studio at home, using affordable materials and practical techniques. From choosing the right space to perfecting your lighting, we’ll help you build a creative workspace that inspires and delivers professional-quality results.
1. Understanding the Art of Still Life Photography
Before diving into your setup, it’s essential to understand what makes still life photography unique. Unlike candid or landscape photography, still life images are carefully composed. Every detail—from object placement to lighting direction—contributes to the mood and story.
Still life photography focuses on arranging everyday objects in a way that highlights their form, texture, and color. It can range from the traditional “fruit bowl on a table” to abstract, conceptual compositions that express emotion or symbolism.
In a sentence: Still life photography is about transforming ordinary objects into extraordinary visual stories through thoughtful arrangement and lighting.
2. Why Create a Home Still Life Studio
A home studio gives you the freedom to experiment, shoot anytime, and control every aspect of your photography without expensive gear or rentals.
Here’s why setting up your own still life studio is worth it:
Cost-Effective: You can use natural light, household items, and DIY props instead of professional studio equipment.
Full Creative Control: You decide on composition, backdrop, and lighting conditions without external constraints.
Convenience: You can practice anytime without traveling to a location or depending on weather.
Learning Experience: Setting up your own studio deepens your understanding of light, texture, and balance.
In short, a home still life studio empowers you to experiment endlessly and master your craft at your own pace.
3. Choosing the Right Space in Your Home
You don’t need a huge room to set up your still life studio. Even a corner with good natural light can become your creative workspace. The key is to find a location with controllable lighting and enough room for your camera, tripod, and setup surface.
Ideal Location Features:
Natural Light Source: A window facing north or east is ideal, as it provides soft, consistent light.
Neutral Walls: Light-colored walls help reflect light evenly; darker walls absorb it and add contrast.
Minimal Distractions: Choose a quiet, clutter-free space to focus on your composition.
Flat Surface: A sturdy table or desk is essential for arranging your subjects.
If your chosen space doesn’t have perfect light, don’t worry—you can always supplement with artificial lighting, which we’ll cover later.
4. Essential Equipment for a Home Still Life Studio
You can create beautiful still life photos with just a few pieces of essential gear. Let’s break down what you’ll need.
In a sentence: A basic still life setup typically includes a camera, tripod, lighting source, background materials, and reflectors.
a) Camera
Any camera that allows manual control of aperture, shutter speed, and ISO will work. DSLRs, mirrorless, or even advanced smartphones can produce excellent results.
Recommended: A camera with interchangeable lenses for creative flexibility.
b) Lenses
Prime lenses with focal lengths between 50mm and 100mm are ideal for still life photography. They produce sharp details and pleasing background blur (bokeh).
Macro lenses are perfect for close-up details.
Standard 50mm lenses are versatile for most still life compositions.
c) Tripod
A tripod is indispensable for stability, especially in low light or long exposures. It helps maintain consistent framing and focus.
d) Lighting
Natural light works beautifully, but if you want full control, invest in:
A softbox or LED panel for even lighting.
Clamp lights or desk lamps as affordable alternatives.
A diffuser (like white fabric or parchment paper) to soften harsh light.
e) Reflectors
Reflectors bounce light onto your subject to fill shadows.
Use white cardboard, foam boards, or aluminum foil for DIY reflectors.
f) Backgrounds and Surfaces
Your background sets the mood. You can use:
Plain colored papers or fabrics.
Wooden boards, tiles, or matt surfaces for texture.
DIY painted boards for custom looks.
g) Props
Props add context and storytelling elements. Choose objects that complement your main subject—vintage cups, books, textiles, or natural elements like leaves and flowers.
h) Remote Shutter or Timer
To avoid camera shake, use a remote shutter release or your camera’s built-in timer.
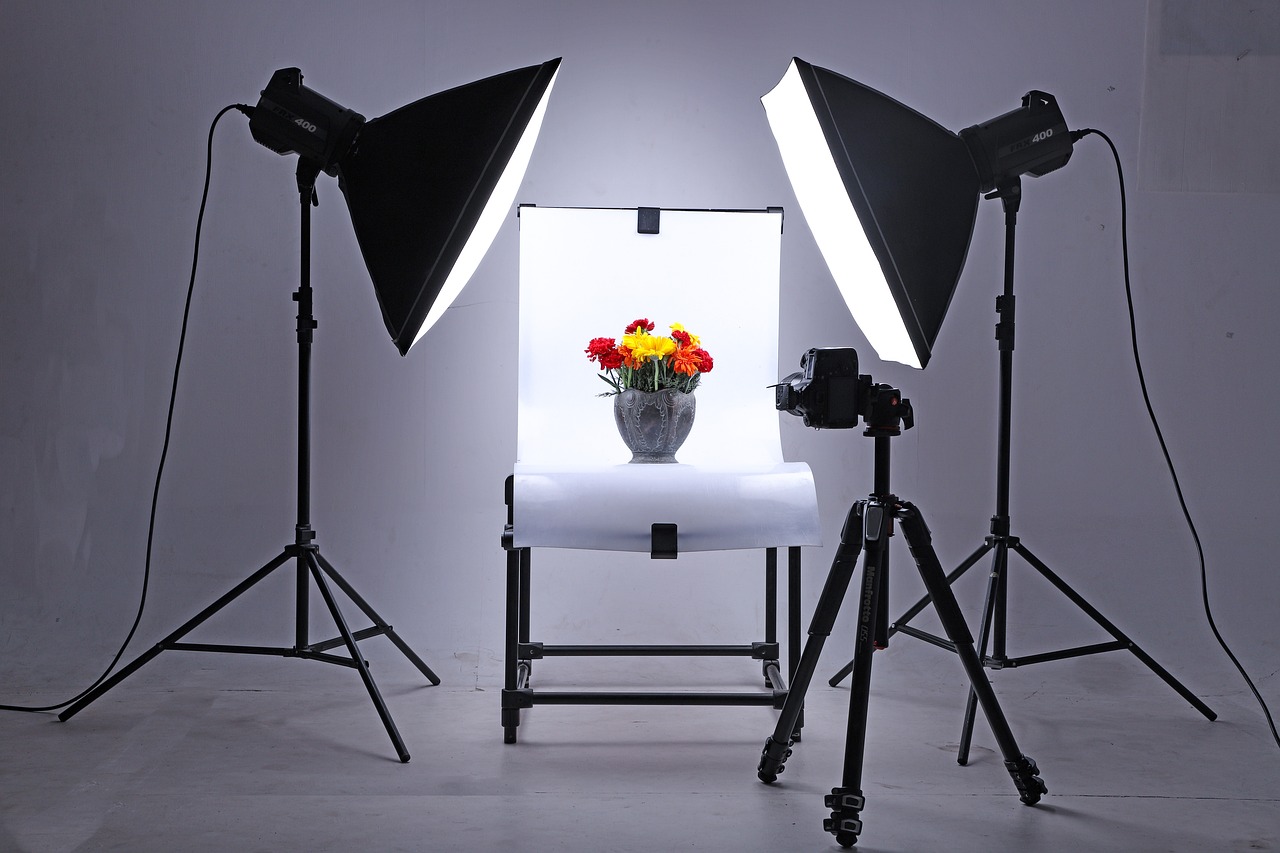
5. Setting Up the Shooting Area
Once you have your equipment, it’s time to assemble your mini studio.
Step-by-Step Setup:
Place your table near a window (for natural light) or set up your artificial light at a 45° angle to your subject.
Attach your backdrop behind the table using clips or tape.
Position your main subject slightly off-center to follow composition principles like the rule of thirds.
Use props to add depth and interest.
Adjust reflectors or white boards to bounce light onto shadowed areas.
Mount your camera on a tripod, frame your shot, and start adjusting lighting and angles.
In a sentence: Position your subject on a flat surface near light, set your camera on a tripod, and use reflectors to shape shadows and highlights.
6. Mastering Lighting Techniques
Lighting is the most critical element in still life photography. It defines texture, depth, and emotion. You can experiment with both natural and artificial light, depending on your style.
a) Natural Light Setup
Natural light from a window gives your still life photos a soft, painterly feel.
Shoot during morning or late afternoon for warm tones.
Use a sheer curtain to diffuse direct sunlight.
Use a reflector opposite the window to fill in shadows.
b) Artificial Light Setup
Artificial lights give you consistency regardless of the time of day.
Position your main light at 45° to your subject.
Use a diffuser to soften shadows.
Add a secondary fill light or reflector for balance.
c) Experimenting with Light Angles
Different lighting angles create different moods:
Front light: Reduces shadows, ideal for simple product shots.
Side light: Enhances texture and depth.
Backlight: Creates dramatic silhouettes or glowing effects for translucent objects.
In a sentence: Side lighting enhances texture, backlighting adds drama, and diffused window light produces soft, natural tones perfect for still life work.
7. Choosing Backgrounds and Surfaces
Backgrounds play a key role in setting the tone of your image. The right backdrop helps your subject stand out while supporting the theme.
a) Simple Backgrounds
Use plain colors to keep the focus on your subject. White, grey, or beige backdrops work well for minimalist looks.
b) Textured Backgrounds
Wood, fabric, and painted boards add a tactile feel to your images. For rustic compositions, a weathered wooden surface looks authentic.
c) DIY Options
You can paint your own backdrops using cardboard, foam boards, or MDF panels.
Experiment with chalk paint, acrylics, or plaster for interesting textures.
In a sentence: Choose backgrounds that enhance your subject’s color and mood—simple ones for elegance, textured ones for storytelling.
8. Composition and Arrangement Tips
Composition turns a collection of objects into a cohesive story. Think of your arrangement as a mini stage set where every item plays a role.
a) Apply the Rule of Thirds
Divide your frame into nine equal parts and place the main subject off-center for visual interest.
b) Use Leading Lines
Arrange props or textures that guide the viewer’s eye toward your subject.
c) Balance Shapes and Colors
Distribute visual weight evenly across your frame. Mix tall and short objects, warm and cool tones, smooth and rough textures.
d) Work with Layers
Create depth by positioning some objects closer to the camera and others farther back.
e) Simplify
Avoid clutter. Every element should contribute to your composition.
In a sentence: Balance color, texture, and space while guiding the viewer’s eye toward your main subject for a harmonious composition.
9. Color Theory and Mood in Still Life
Color profoundly affects how viewers perceive your image.
Warm tones (red, orange, yellow) evoke energy and comfort.
Cool tones (blue, green, purple) create calmness and sophistication.
Neutral tones allow your subject to shine without distraction.
Use color intentionally: for example, a vibrant orange fruit against a dark blue background creates striking contrast.
In a sentence: Use contrasting or complementary colors to create visual impact and emotional resonance in your still life images.
10. Camera Settings for Still Life Photography
Mastering your camera settings ensures crisp, well-lit, and expressive photos.
Recommended Settings:
Mode: Manual or Aperture Priority (A/Av).
Aperture: f/5.6 to f/11 for sharpness and depth of field.
Shutter Speed: Adjust according to light; use a tripod for slower speeds.
ISO: Keep between 100–400 for minimal noise.
White Balance: Match to your light source (daylight, tungsten, etc.).
Focus: Manual focus gives more control over critical areas.
In a sentence: Use a low ISO, moderate aperture, and tripod-assisted slow shutter speeds for crisp, professional still life shots.
11. Shooting Tethered for Better Results
Tethered shooting connects your camera to a computer, allowing you to preview images in real-time. This helps you assess composition, focus, and lighting instantly.
Benefits:
Immediate feedback.
Easier exposure and color adjustments.
Efficient workflow for editing and retakes.
In a sentence: Shooting tethered allows precise composition and lighting adjustments by previewing your still life images live on a computer screen.
12. Editing Your Still Life Photos
Post-processing is where your image truly comes alive. Even simple adjustments can enhance texture, color, and lighting balance.
Basic Editing Steps:
Crop and straighten for better framing.
Adjust exposure to fine-tune brightness.
Enhance contrast and clarity for texture.
Correct colors using white balance tools.
Remove dust or blemishes with healing brushes.
Sharpen selectively for detail emphasis.
Recommended Software: Adobe Lightroom, Capture One, or Photoshop.
In a sentence: Post-processing refines your still life photos by enhancing detail, adjusting light, and creating cohesive visual harmony.
13. Creative Themes and Ideas to Try
Once your studio is ready, explore various still life themes to build your portfolio.
Classic Still Life: Fruits, flowers, and glassware.
Modern Minimalist: Single object on a clean background.
Rustic Vintage: Old books, tools, and natural textures.
Color Harmony: Focus on tonal balance and complementary hues.
Conceptual Still Life: Symbolic objects that express emotions or ideas.
In a sentence: Experiment with different still life themes—classic, minimalist, vintage, or conceptual—to express your unique artistic voice.
14. Common Mistakes and How to Avoid Them
Every photographer encounters challenges when starting out, but awareness and practice can help you overcome them quickly. One of the most common issues beginners face is flat lighting—this happens when there’s no clear directional light source, causing your image to look dull and lifeless. To fix this, use side lighting or add reflectors to create depth and dimension in your scene.
Another frequent problem is harsh shadows, which occur when your light source is too strong or too close to the subject. The solution is to diffuse the light using soft materials like white fabric or parchment paper, or simply move the light source further away to soften the effect.
A distracting background can also ruin an otherwise great shot. This usually happens when the setup is cluttered or visually overwhelming. The best approach is to simplify your composition—remove unnecessary props and ensure the background complements rather than competes with your subject.
Blurry images are another frustration, often caused by camera shake during shooting. Always use a tripod or remote shutter release to stabilize your camera, especially in low-light conditions or when using slower shutter speeds.
Finally, dull colors can result from incorrect white balance settings. To restore vibrancy and accuracy, adjust your white balance manually or use color calibration tools to match your lighting conditions.
In a sentence: Avoid flat lighting, cluttered backgrounds, and camera shake by controlling light direction, simplifying composition, and stabilizing your camera.
15. Budget-Friendly Tips for Your Home Studio
Setting up your still life studio doesn’t have to cost much. With creativity, you can achieve professional results affordably.
Practical Ideas:
Use daylight from a window instead of buying lights.
Make reflectors from white foam boards.
Paint your own backdrops on cardboard.
Repurpose old furniture or boards for tabletops.
Use household items like kitchen utensils, books, or fabric as props.
In a sentence: Build a stunning still life studio on a budget using natural light, homemade reflectors, and repurposed household materials.
16. Maintaining and Expanding Your Home Studio
Once your setup is functional, think about improving it gradually.
Upgrade lights to adjustable LED panels.
Add storage for props and backgrounds.
Collect unique objects from thrift shops.
Document your setups for consistency.
In a sentence: Grow your still life studio step by step by upgrading equipment, organizing props, and experimenting with new styles.
Final Thoughts: Turning Your Studio into a Creative Sanctuary
Your home still life studio isn’t just a workspace—it’s a creative sanctuary where ideas, light, and textures meet. The beauty of still life photography lies in its calmness and precision. You’re not chasing moments; you’re crafting them deliberately.
With time, you’ll learn to see light differently, find inspiration in ordinary objects, and create images that tell silent, powerful stories.
Disclaimer:
This article is for educational and informational purposes only. Photography techniques and recommendations discussed are based on general best practices and may vary depending on your equipment and environment. Always follow safety guidelines when handling electrical devices, lighting, and equipment.