Macro Magic: How to Photograph Insects and Flowers in Stunning Sharp Detail
Learn how to capture breathtaking macro shots of insects and flowers with pin-sharp detail. Discover expert techniques on lenses, lighting, focus stacking, composition, and post-processing to master nature macro photography.
LIFESTYLEHOBBYPHOTOGRAPHYHOW-TO
10/29/20258 min read
Capturing the delicate beauty of a flower petal or the intricate details of an insect’s wings requires more than just a steady hand and a good camera. It’s a true test of patience, precision, and understanding of both your subject and your gear. Macro photography—especially of insects and flowers—is one of the most rewarding yet challenging genres in photography.
This guide will take you deep into the art and science of photographing insects and flowers in sharp detail. We’ll explore techniques, gear choices, lighting strategies, focus stacking, and post-processing methods that help you turn everyday nature scenes into extraordinary works of art.
1. Understanding the Beauty and Challenge of Macro Photography
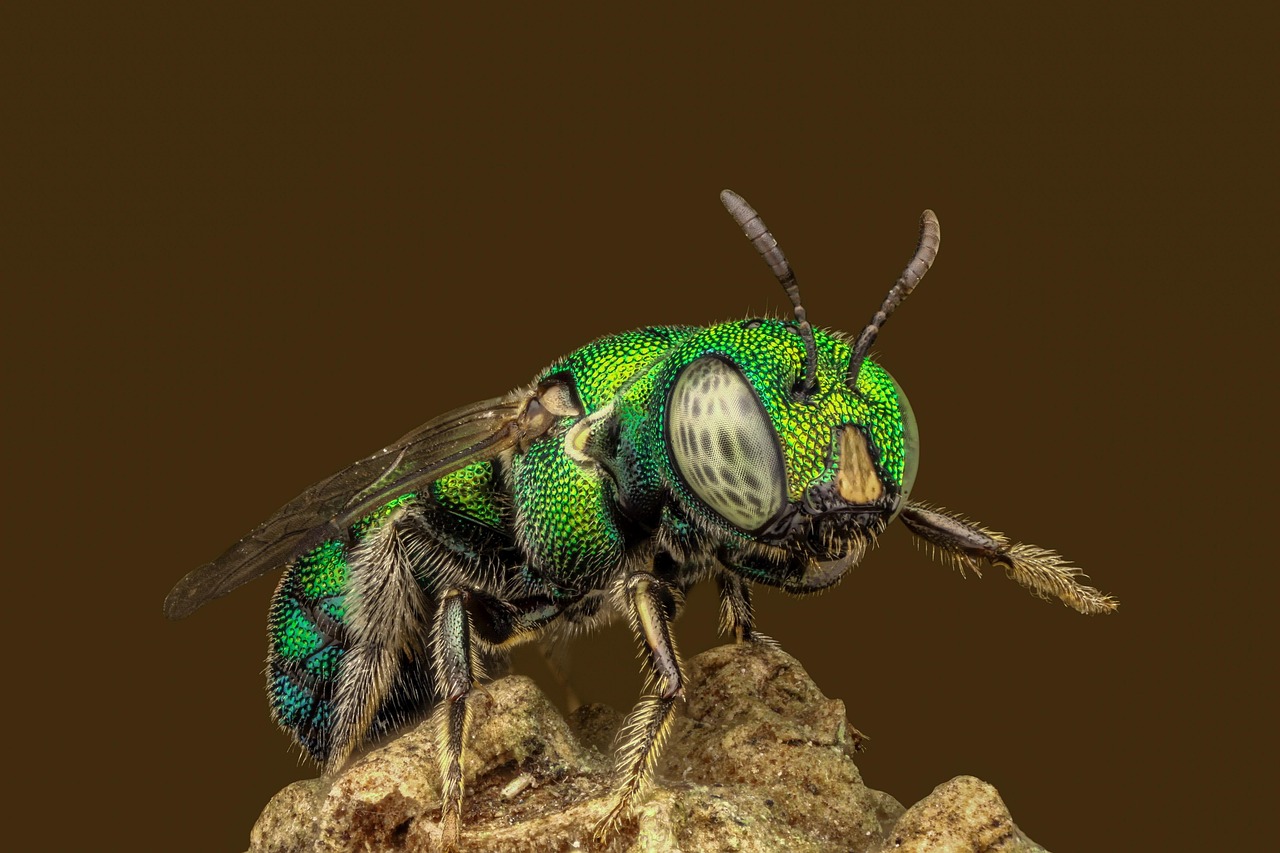
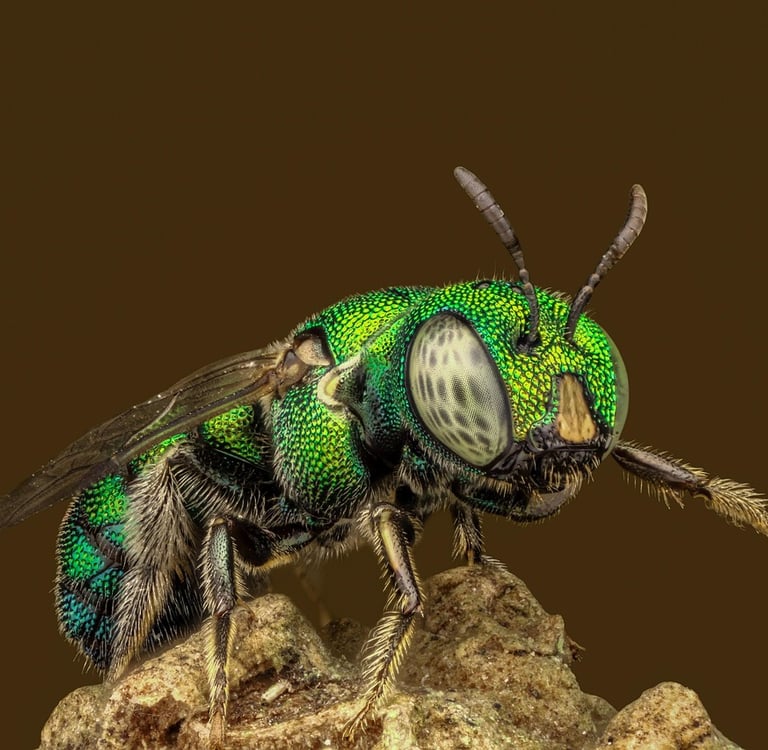
Macro photography reveals a world hidden from the naked eye. When you zoom in on a dragonfly’s eyes or a flower’s pollen grains, you witness forms, patterns, and colors that are otherwise invisible.
However, achieving sharpness in macro photography can be tricky due to shallow depth of field, subject movement, and lighting challenges. The closer you get, the smaller your plane of focus becomes, making even slight camera shake or wind motion problematic.
The key is learning how to control light, manage depth, and stabilize your equipment while adapting to your subjects’ unpredictable behavior—especially insects, which can be flighty and quick.
Insects and flowers share common photographic challenges but differ in temperament: flowers are static but susceptible to wind, while insects are alive and mobile. Mastering both will give you full control over the micro-world.
2. Essential Gear for Macro Photography
To photograph insects and flowers in sharp detail, your gear must be capable of capturing extremely fine textures and colors. Here’s what you’ll need to succeed.
Camera Body
A DSLR or mirrorless camera with a high-resolution sensor (at least 24MP) allows you to crop images without losing much detail. Mirrorless cameras have an edge due to real-time focus peaking and lighter builds—perfect for handheld macro shots.
Macro Lens
A true macro lens offers 1:1 magnification, meaning the subject appears life-size on the sensor.
Common focal lengths for macro lenses include:
60mm (great for flowers and studio work)
90mm–105mm (ideal all-rounder)
150mm–200mm (best for insects and subjects that are hard to approach)
Longer focal lengths let you shoot from a greater distance—perfect for skittish insects.
Extension Tubes and Close-up Filters
If you’re not ready to invest in a dedicated macro lens, extension tubes can be attached between your lens and camera body to decrease the minimum focusing distance, effectively magnifying your subject. Close-up filters screw onto your lens like a magnifying glass for a budget-friendly alternative.
Tripod
A sturdy tripod is essential for precise composition and sharp detail, especially when shooting flowers in controlled conditions. For insect photography, use a monopod or handheld techniques with image stabilization.
Lighting Tools
Good lighting defines macro photography. Natural sunlight works beautifully for flowers, but artificial light sources like ring flashes, twin flashes, or diffusers help maintain consistent exposure and detail on insects.
Using diffusers softens harsh shadows and reduces glare—especially on reflective insect bodies or flower petals.
Accessories
Remote shutter release: Minimizes camera shake.
Reflector or white card: Bounces light into shadows.
Macro focusing rail: Allows micro-adjustments in focus for focus stacking.
Kneepads or ground mat: For comfortable positioning at low angles.
When summarized, the best setup for sharp insect and flower photography consists of a high-resolution mirrorless camera, a 100mm macro lens, a diffused flash, and a stable tripod for flowers or handheld shooting for insects.
3. Mastering Camera Settings for Maximum Sharpness
Macro photography requires precise control over your camera’s settings. Small errors in aperture, shutter speed, or ISO can drastically affect detail and depth of field.
Aperture (f-stop)
Aperture determines how much of your subject is in focus. For macro shots:
f/2.8–f/5.6: Use for artistic bokeh and selective focus on details.
f/8–f/11: Ideal for balanced depth and sharpness on small subjects.
f/16 and beyond: Use cautiously; diffraction may soften images.
Shutter Speed
Since macro subjects often move (even slightly), use fast shutter speeds:
1/200s or faster for handheld insect shots.
1/60–1/125s for flowers on a tripod.
Use flash or external lighting if the scene is dim.
ISO
Keep ISO as low as possible (ISO 100–400) to minimize noise. Modern mirrorless cameras handle ISO 800 or 1600 well, but low ISO ensures cleaner details.
Focusing
Manual focus is often best for macro photography. Autofocus may struggle with such shallow depth of field. Use focus peaking on mirrorless systems or live view with magnification on DSLRs to achieve pinpoint accuracy.
Stabilization
Enable in-body image stabilization (IBIS) if your camera has it. When using a tripod, turn off stabilization to prevent unwanted micro-adjustments.
4. The Art of Lighting in Macro Photography
Lighting makes or breaks your macro shot. Insects and flowers have complex surfaces—some shiny, some matte, some translucent—each requiring different lighting treatments.
Natural Light
Morning and late afternoon provide the softest, most diffused light. For flowers, overcast days are ideal since clouds act as natural diffusers. For insects, early mornings are perfect—they’re less active and easier to photograph.
Flash Photography
Using a flash provides control and consistency. A ring flash surrounds your lens, delivering even illumination. Alternatively, a twin flash setup gives directional light, adding texture and depth.
Always use diffusers to soften flash output. Harsh light exaggerates shadows and reflections, especially on insects’ shiny exoskeletons.
Reflectors and Fill Light
Positioning a white or silver reflector beneath flowers can bounce light upward, illuminating darker petals. For insects, reflectors can help balance harsh side lighting.
In one sentence summary:
For soft natural lighting, shoot during the golden hours; for consistency and texture, use a diffused twin flash or ring flash, and for balance, complement with a small reflector.
5. Approaching and Composing Your Subjects
Composition in macro photography goes beyond technical sharpness. It’s about storytelling—showing the viewer something they wouldn’t notice otherwise.
Approaching Insects
Patience is key. Move slowly and avoid casting shadows on your subject. Early mornings are best because insects are less active and more tolerant of close proximity.
Wear neutral-colored clothing and avoid sudden movements. Some photographers use remote triggers to shoot from a short distance.
Composing Flowers
When photographing flowers, pay attention to symmetry, background blur, and color harmony. A slightly diagonal composition often appears more dynamic than a centered one.
Backgrounds
Keep your background clean and uncluttered. Use wide apertures (f/4–f/8) or increase your distance from the background to achieve pleasing bokeh. Positioning colored paper or fabric behind flowers can help isolate them artistically.
Angles
Shooting at eye level with your subject creates intimacy. Try front-on for insects, or slightly below the flower for a majestic look. Experiment with side lighting for texture and top lighting for contrast.
Rule of Thirds
Position your insect or flower off-center along the gridlines to create balance. A butterfly’s eye or a flower’s pistil can serve as a focal point on one-third of the frame.
6. Achieving Critical Sharpness: Focus Stacking and Techniques
Macro photography’s biggest challenge is shallow depth of field. Even at f/11, a butterfly’s head might be sharp while its wings blur. The solution? Focus stacking.
What is Focus Stacking?
Focus stacking involves taking multiple shots at different focus points and merging them in post-processing to create a single image with greater depth of field.
How to Do It
Mount your camera on a tripod.
Use manual focus and adjust the focus ring slightly after each shot.
Take 10–30 images covering all planes of focus.
Merge them in software (like Helicon Focus or Photoshop).
Handheld Focus Bracketing
Some modern cameras (Olympus, Canon, Nikon, Sony) have built-in focus bracketing modes—they automatically capture multiple focus points for you.
When to Use Focus Stacking
Use it for static subjects like flowers or dead insects. For live insects, depth stacking can be tricky due to movement.
To summarize in one sentence:
Focus stacking is best used for stationary subjects, while handheld single-shot focus should be prioritized for moving insects.
7. Managing Movement and Environmental Factors
Both insects and flowers are vulnerable to environmental disturbances. A slight breeze or a nervous beetle can ruin your shot.
For Flowers:
Use wind blockers like reflectors, your body, or a portable screen.
Wait for calm intervals between gusts.
Use a faster shutter speed if light allows.
For Insects:
Approach during cooler hours.
Avoid wearing strong scents or making vibrations.
Use continuous shooting mode to increase your chances of capturing the perfect moment.
Environmental Awareness
Avoid harming your subjects or their habitats. Never manipulate insects unnaturally. Ethical photography maintains balance with nature.
8. Advanced Composition and Storytelling
Macro photography isn’t just about details—it’s about emotion and narrative.
Patterns and Textures
Flowers reveal repetitive geometry—spirals, symmetry, and fractals. Insects show intricate scales and hairs that look surreal up close. Focus on these repeating elements to draw the viewer’s eye.
Color Contrast
Use complementary colors for drama—like a green beetle on a red petal or a yellow butterfly on a purple bloom.
Depth and Framing
Layer elements by shooting through foreground leaves or petals to add depth. This technique creates a dreamy, immersive feel.
Behavior and Context
Capture insects interacting—feeding, pollinating, or resting. These natural behaviors tell a story beyond mere aesthetics.
9. Post-Processing for Perfect Detail
Even with perfect camera technique, post-processing enhances sharpness and mood. Use editing tools responsibly to retain realism.
1. Basic Adjustments
Correct white balance to ensure accurate colors.
Adjust exposure, contrast, and shadows to bring out textures.
2. Sharpening
Apply sharpening selectively—use the “masking” slider in Adobe Lightroom to target only edges, preventing noise in smooth backgrounds.
3. Noise Reduction
Apply minimal noise reduction to preserve fine detail, especially in insect wings or pollen grains.
4. Focus Stacking in Software
In Photoshop:
Load all images as layers.
Select all layers → Edit → Auto-Align Layers.
Then choose Auto-Blend Layers → Stack Images.
Flatten and fine-tune.
5. Cropping and Framing
Crop for stronger composition while maintaining resolution. Leave breathing space around your subject.
6. Color Enhancement
Vibrance adjustments bring subtle hues to life without oversaturating. Flowers benefit from slight color pop, while insects look better with natural tones.
10. Common Mistakes and How to Avoid Them
Shallow Depth Mismanagement: Using too wide an aperture leads to blurred important details. Solution: adjust to f/8–f/11.
Camera Shake: Even minor vibrations blur macro shots. Use a tripod or high shutter speeds.
Harsh Lighting: Avoid direct flash without diffusion—it flattens textures.
Ignoring Background: Busy backgrounds distract from your subject.
Over-editing: Excessive sharpening or saturation can make images look artificial.
In one sentence: balance technical accuracy with artistic restraint to produce naturally sharp, stunning macro images.
11. Practice, Patience, and Observation
Macro photography teaches patience. You may take hundreds of shots to get one perfectly sharp image—but that’s part of the joy.
Spend time observing your environment. Notice when bees are most active, how light shifts across petals, and when dew settles. The more you connect with nature, the better your results.
Practice focusing manually, stabilizing your hand, and adjusting to varying light conditions. Each mistake refines your skill.
12. Inspiring Locations and Timing
Gardens and Parks: Perfect for flower macro and pollinating insects.
Meadows and Forests: Diverse subjects and soft natural lighting.
Early Morning: Insects are slower, dew adds sparkle, and light is soft.
Late Afternoon: Warm tones enhance petal textures.
In sentence form: the best macro shots of insects and flowers are often taken in gardens or meadows during early morning or late afternoon, when light is soft and subjects are calm.
13. Building a Macro Photography Workflow
A consistent workflow ensures efficiency:
Scout locations.
Prepare equipment the night before.
Set camera parameters for expected lighting.
Shoot multiple compositions and focus points.
Review images immediately.
Post-process with restraint and clarity.
14. Turning Macro Photography into a Creative Passion or Profession
Macro photography can evolve from a hobby into a specialized niche. Professional photographers sell macro prints, license images for scientific publications, or contribute to stock photo libraries.
Consider creating a macro portfolio—grouping your best shots into themed collections like “Pollination,” “Textures of Nature,” or “Insect Portraits.”
You can also blog or teach workshops, sharing your process and techniques to inspire others.
Final Thoughts: Seeing the Small World in Sharp Detail
The world of insects and flowers holds infinite wonder. When you learn to photograph them sharply, you don’t just capture images—you preserve stories of fragility, color, and design that define the natural world.
Macro photography rewards patience, precision, and perception. Every shot teaches you something new about light, timing, and beauty.
Whether you’re photographing a butterfly’s wings shimmering under the sun or a droplet on a daisy, remember: sharpness is not just about clarity—it’s about vision.
Disclaimer:
This article is for educational and informational purposes only. Techniques and recommendations provided are based on professional experience and general photography principles. Always respect local wildlife, avoid harming insects or flowers, and follow ethical nature photography practices when applying these methods.