Star Trails Photography: Capture the Night Sky Like a Pro
Discover everything you need to know about star trails photography, from equipment and settings to creative techniques. Learn how to capture breathtaking night skies and turn stars into stunning trails of light.
HOBBYLIFESTYLEPHOTOGRAPHYHOW-TOFEATURED
4/2/20256 min read
What Are Star Trails and How to Photograph Them
Capturing the night sky has fascinated photographers for generations. One of the most mesmerizing ways to showcase the heavens is through star trails photography—images where stars appear as continuous streaks across the sky due to the Earth's rotation. This guide will walk you through everything you need to know, from understanding star trails to mastering the techniques for photographing them.
1. Understanding Star Trails
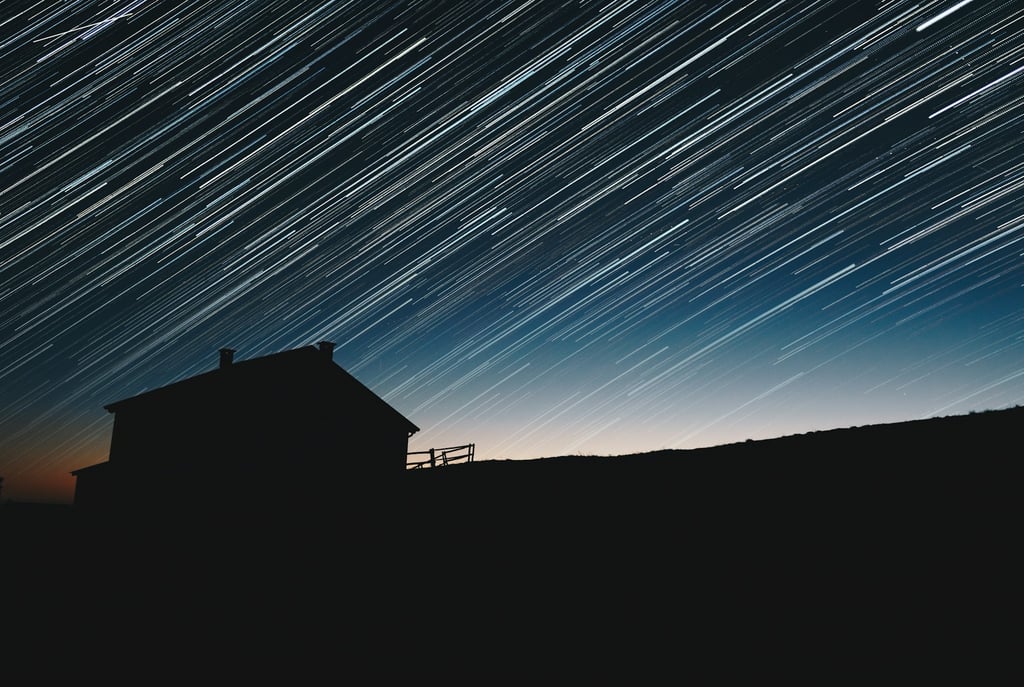
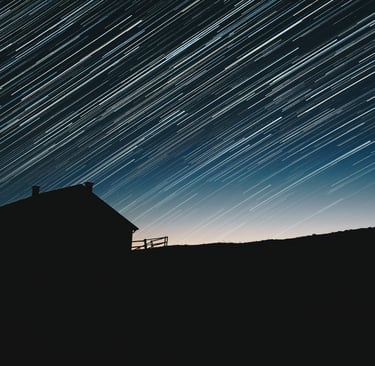
Star trails are the apparent paths stars trace across the night sky when captured in long-exposure photographs. This effect occurs because the Earth rotates on its axis, causing stars to move relative to the ground. When photographed over time, these movements create circular or arc-shaped trails.
The appearance of star trails depends on your location and the direction you’re photographing. In the Northern Hemisphere, pointing your camera toward Polaris, the North Star, results in concentric circles around it. Conversely, in the Southern Hemisphere, the star trails revolve around the South Celestial Pole, creating similar circular patterns.
Star trails can range from short arcs—captured with exposures of a few minutes—to dramatic full-circle trails requiring several hours of shooting. The key is patience, planning, and understanding how the stars move across your specific latitude.
2. Essential Equipment for Star Trails Photography
To capture high-quality star trails, you need the right equipment. Here’s what you’ll need:
Camera: A DSLR or mirrorless camera with manual settings is ideal. Full-frame cameras are preferred for their low-light performance, but crop sensors also work effectively.
Lens: Wide-angle lenses (14mm–35mm) are preferred to capture a larger portion of the sky. A fast lens with a wide aperture (f/2.8 or lower) allows more light to hit the sensor.
Tripod: A sturdy tripod is essential to keep the camera completely stable during long exposures. Even minimal movement will blur your star trails.
Remote Shutter Release or Intervalometer: This allows you to trigger the camera without touching it, avoiding vibrations, and enabling consecutive shots for stacking multiple exposures.
Extra Batteries and Memory Cards: Long-exposure sessions can drain batteries quickly, and you may capture hundreds of images for stacking.
Optional: Star trackers, which move your camera to match the stars' movement, can reduce star streaks if your goal is sharp individual stars rather than trails.
3. Choosing the Right Location
A dark sky location is crucial for capturing star trails. Light pollution from cities can overpower the stars, reducing the visibility of trails. Use apps like Dark Sky Finder to locate areas with minimal light interference.
Consider the following factors when choosing a location:
Elevation: Higher elevations can reduce atmospheric interference.
Foreground Interest: Mountains, trees, lakes, or abandoned buildings add depth and interest to your compositions.
Weather: Clear skies are essential. Clouds can ruin long-exposure shots, though partial clouds can sometimes create dramatic effects.
Safety: Ensure the location is safe, accessible, and legal for nighttime photography.
4. Camera Settings for Star Trails
Proper camera settings are vital for capturing crisp and luminous star trails. Here are the main settings to consider:
Mode: Manual mode allows full control over shutter speed, aperture, and ISO.
Focus: Switch to manual focus and focus at infinity or on a bright star.
Aperture: Wide apertures (f/2.8–f/4) capture more light.
ISO: Start with ISO 800–1600 and adjust depending on your camera’s noise performance.
Shutter Speed: For individual exposures, 15–30 seconds is common. Longer exposures can create noise, so stacking multiple shorter exposures is preferred.
In summary: For star trails, manual focus at infinity, wide aperture, ISO 800–1600, and 20–30 second exposures on a stable tripod are a solid starting point.
5. Techniques for Capturing Star Trails
There are two main techniques for photographing star trails: single long exposure and stacking multiple exposures.
Single Long Exposure:
Set your camera to bulb mode for exposures lasting several minutes to hours.
Advantage: Produces a continuous trail without gaps.
Disadvantage: Increased sensor noise and potential overexposure of foreground elements.
Stacking Multiple Exposures:
Take consecutive shorter exposures (15–30 seconds each) and combine them using software like StarStaX or Adobe Photoshop.
Advantage: Reduces noise and prevents overexposure while allowing for flexible post-processing.
Disadvantage: Requires post-processing and more memory storage.
Stacking has become the preferred method among modern star trail photographers because it offers more control and better image quality.
6. Planning Your Star Trails Shot
Proper planning can make the difference between a mediocre shot and a breathtaking masterpiece.
Use Apps: Tools like Stellarium, Photopills, or SkySafari can help you identify star positions, plan your composition, and predict star movement.
Time Your Shoot: Shooting during a new moon minimizes moonlight, enhancing the contrast of stars.
Determine Orientation: Decide whether you want your trails to form full circles (toward celestial poles) or arcs (east-west horizon shots).
Compose Foreground Elements: Position mountains, trees, or buildings to add depth and perspective.
7. Common Challenges and How to Solve Them
Star trails photography can be tricky. Here’s a breakdown of common problems and their solutions:
Blurry stars are usually caused by poor focus or tripod instability; solve this by using manual focus on a bright star and ensuring your tripod is rock solid. Excessive noise results from high ISO or overly long exposures; stack multiple shorter exposures or use noise reduction in post-processing. Light pollution from urban areas can create an orange glow; shooting in dark locations or using light pollution filters mitigates this issue.
In short, careful focus, stable equipment, moderate ISO, and strategic location selection are key to overcoming typical star trails challenges.
8. Composition Tips for Stunning Star Trails
The composition is what transforms star trails from technical captures into works of art. Consider these tips:
Rule of Thirds: Place celestial poles or foreground elements along the thirds for balanced compositions.
Leading Lines: Use rivers, roads, or pathways to lead the viewer’s eye toward the trails.
Foreground Silhouettes: Trees, mountains, or structures add scale and depth.
Color and Contrast: Combine cooler night sky tones with warmer foreground light to enhance visual appeal.
9. Post-Processing Star Trails
Post-processing is essential to maximize the impact of your star trails. Key steps include:
Stacking Images: Use StarStaX or Photoshop to merge multiple exposures, forming continuous trails.
Noise Reduction: Apply noise reduction tools to reduce graininess without losing detail.
Color Adjustment: Enhance contrast and saturation for a more vivid sky.
Foreground Enhancement: Brighten shadows or add subtle lighting to foreground elements.
A sentence version of the post-processing table: Stacking exposures creates seamless trails, noise reduction improves image quality, color adjustment enhances the sky, and foreground editing adds depth and drama.
10. Advanced Star Trails Techniques
Once you’re comfortable with basic star trails, experiment with advanced techniques:
Light Painting: Illuminate foreground elements with LED lights or flashlights during long exposures.
Milky Way Integration: Combine star trails with the Milky Way for dramatic night sky compositions.
Panoramic Star Trails: Stitch multiple wide-angle shots to capture a larger sky area.
Time-Lapse Star Trails: Create moving visual stories by stitching star trail sequences into videos.
These techniques require additional planning, creativity, and post-processing but can produce truly breathtaking results.
11. Safety and Practical Considerations
Night photography often requires venturing into remote locations. Safety is paramount:
Inform someone of your location.
Dress appropriately for weather conditions.
Bring sufficient light sources (headlamp, flashlight).
Keep wildlife and terrain risks in mind.
Additionally, be mindful of battery life, memory usage, and lens condensation, all of which can affect long-exposure photography.
12. Inspiring Star Trails Examples
Polar Star Circles: Images captured near Polaris show concentric star circles.
South Pole Trails: Similar patterns occur around the South Celestial Pole in the Southern Hemisphere.
Foreground Integration: Abandoned structures, mountain ranges, and lakes reflecting star trails add visual interest.
Time-Lapse Videos: Moving sequences that reveal star trails dynamically across the night sky.
Each example demonstrates how careful planning, technical skill, and creative vision combine to produce compelling star trail photographs.
Conclusion
Star trails photography offers a unique way to capture the night sky and visualize the Earth’s rotation. While it requires patience, proper equipment, and careful planning, the results are truly awe-inspiring. Whether you’re aiming for single long exposures or multi-frame stacks, understanding star movements, mastering camera settings, and exploring creative techniques will elevate your night photography to a professional level.
By experimenting with composition, foreground elements, and post-processing, you can create mesmerizing images that bring the motion of the universe to life. Star trails photography not only challenges your technical skills but also allows you to explore the beauty and mystery of the cosmos.
Disclaimer:
The information provided in this guide is for educational and informational purposes only. The author is not responsible for any equipment damage, personal injury, or accidents resulting from following these guidelines. Always prioritize safety when photographing in remote or dark locations, and follow local laws and regulations regarding night photography.