The Art of Motion Blur: Mastering Slow Photography for Stunning Creative Shots
Discover how to capture motion blur and master the art of slow photography. Learn expert tips, camera settings, and techniques to turn movement into breathtaking visual art. Perfect for beginners and advanced photographers alike.
HOBBYLIFESTYLEPHOTOGRAPHYHOW-TO
3/12/202510 min read
How to Capture Motion Blur: The Art of Slow Photography
Photography has long been a way of freezing a moment in time, capturing a split second that would otherwise slip away. Yet, there’s an equally mesmerizing side to photography—slow photography, where motion isn’t frozen but rather painted across the frame, telling a story of movement, emotion, and the passage of time. This technique is known as motion blur photography, and it’s a creative art form that transforms energy into imagery.
In this comprehensive guide, we’ll explore every detail of capturing motion blur: from understanding its artistic essence to mastering the technical side—like shutter speeds, lighting, composition, and post-processing. Whether you’re using a DSLR, mirrorless camera, or even a smartphone, this post will teach you how to make movement your muse.
1. Understanding Motion Blur and Slow Photography
Motion blur is the visual streaking or smearing of moving objects in a photograph. It happens when the camera’s shutter remains open long enough to record the motion of a subject—or the movement of the camera itself. While conventional photography often strives for sharpness, slow photography embraces softness and flow, transforming motion into art.
Motion blur tells stories in ways that sharp images cannot. A car’s light trails racing through the night, waves softly blending into mist, or a dancer twirling into color—all convey energy, emotion, and continuity.
In essence, motion blur photography is about slowing down time, giving viewers a glimpse into what happens between moments.
Why Motion Blur Matters
Motion blur photography goes beyond aesthetics. It’s a tool of expression—a way to:
Emphasize motion and energy.
Evoke emotion and atmosphere.
Create abstract or surreal visuals.
Depict passage of time or rhythm in a static image.
From a creative standpoint, motion blur offers endless storytelling possibilities. It reminds us that not all beauty is sharp or still; sometimes, beauty lives in movement itself.
2. The Science Behind Motion Blur
Before diving into creative techniques, it helps to understand what causes motion blur scientifically.
When you press the shutter button, the camera sensor is exposed to light for a certain duration—known as the shutter speed. The longer the shutter stays open, the more light (and movement) is captured.
If the subject moves while the shutter is open, its position changes across the frame, and that movement registers as a blur.
For instance:
A shutter speed of 1/1000 second freezes motion—perfect for sports photography.
A shutter speed of 1/15 second or slower captures visible blur trails, ideal for creative motion photography.
In short:
Fast shutter = frozen moment. Slow shutter = captured motion.
Your challenge as a photographer is to find the perfect balance between exposure and motion to express the desired artistic effect.
3. Essential Equipment for Capturing Motion Blur
Though motion blur photography can be done with any camera, using the right gear gives you more control and creative options.
Camera
DSLR or Mirrorless: Offers full manual control over shutter speed, aperture, and ISO.
Compact Cameras or Smartphones: Can work with manual or “Pro” modes to adjust shutter speed.
Lens
Wide-Angle Lenses (16–35mm): Excellent for landscapes, water motion, or light trails.
Telephoto Lenses (70–200mm): Useful for isolating moving subjects like dancers or athletes.
Prime Lenses: Provide sharp images and large apertures for creative effects.
Tripod
A sturdy tripod is essential for slow shutter shots. It keeps your camera steady, preventing unintentional shake during long exposures.
Remote Shutter or Timer
To avoid camera shake when pressing the shutter, use a remote release or set a 2-second timer.
ND Filter (Neutral Density)
An ND filter reduces the amount of light entering the lens, allowing slower shutter speeds in bright daylight. It’s like sunglasses for your camera.
Optional Accessories
Polarizing Filter: Reduces reflections and enhances colors.
Camera Strap or Weight Hook: Stabilizes your setup in windy conditions.
In one sentence, the essential tools for motion blur photography include a camera with manual controls, a sturdy tripod, remote shutter release, ND filter, and optionally, a polarizer for contrast and color balance.
4. The Key Settings: How to Capture Motion Blur
Now that you have your gear ready, let’s dive into the settings that make or break motion blur photography.
Shutter Speed
Shutter speed is the most important factor. The slower it is, the more blur appears.
Here’s a general guide:
1/60 – 1/15 sec: Mild motion blur (walking person, slow water).
1/8 – 1 sec: Moderate blur (vehicles, dancing subjects, water flow).
1–30 sec: Long exposure blur (light trails, waterfalls, star trails).
Aperture
Aperture controls depth of field and light intake.
For long exposures, use:
Narrow apertures (f/8–f/16) to avoid overexposure and maintain sharpness in static elements.
ISO
Keep ISO as low as possible (ISO 100–200) to minimize noise, since long exposures amplify digital grain.
Focus
Use manual focus or pre-focus on your subject before shooting, especially in low light.
White Balance
Set white balance manually or use daylight/tungsten modes depending on lighting conditions to ensure color accuracy.
Stabilization
Turn off in-lens or in-body stabilization when using a tripod—it can sometimes create unwanted shake in long exposures.
In short: slow down your shutter, narrow your aperture, lower your ISO, and stabilize your camera. That’s the perfect recipe for motion blur.
5. Creative Techniques for Motion Blur Photography
Motion blur opens a wide playground for creativity. Let’s explore some classic and innovative ways to use it artistically.
(a) Panning
In panning, you move the camera along with the moving subject while using a slow shutter speed.
The subject stays relatively sharp, while the background blurs, creating a sense of speed.
Shutter Speed: 1/30–1/125 sec.
Ideal for: cyclists, cars, runners, or animals in motion.
(b) Intentional Camera Movement (ICM)
Instead of stabilizing the camera, deliberately move it during exposure.
Try vertical sweeps for trees, horizontal for landscapes, or circular for abstract art.
Shutter Speed: 1/4–2 seconds.
(c) Long Exposure Landscapes
Capture water, clouds, or night skies in motion to convey tranquility or dreamlike softness.
Use ND filters during the day to achieve exposures of 10–30 seconds.
Ideal for waterfalls, rivers, or seascapes.
(d) Light Trails
At night, slow shutter speeds reveal dazzling streaks of light from moving cars, bikes, or city lights.
Shutter Speed: 5–30 seconds.
Use a tripod and low ISO for clean results.
(e) Motion Portraits
Blend stillness and blur by having your subject remain partially still while other elements move.
Shutter Speed: 1/8–1/2 second.
Combine flash for a “frozen + blurred” dual effect.
(f) Zoom Blur
Twist your zoom lens during exposure to create a dynamic tunnel or burst effect.
Shutter Speed: 1/10–1/2 second.
In essence, each technique manipulates time differently—panning freezes motion within motion, while long exposures transform it into poetic flow.
6. Capturing Motion Blur in Nature
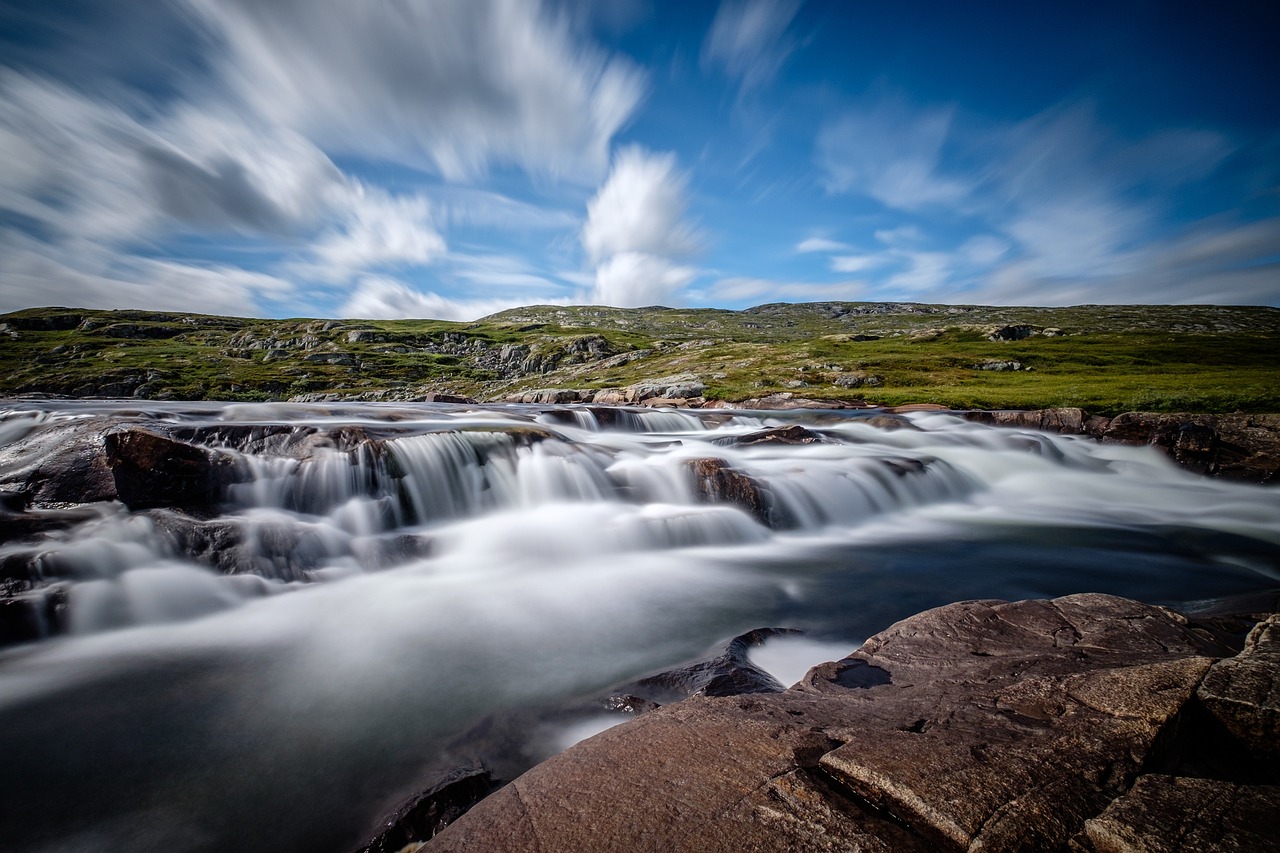
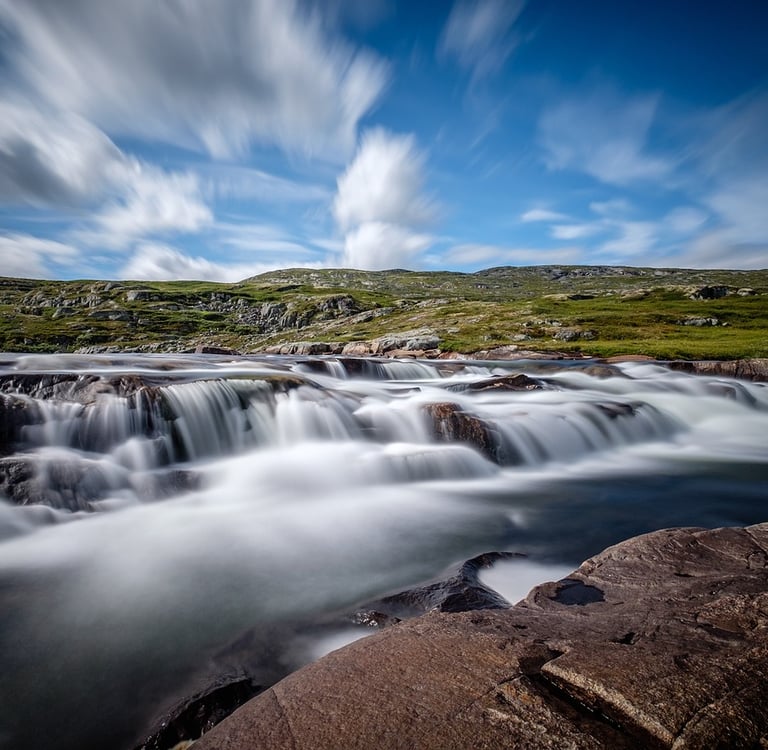
Nature offers abundant opportunities to explore motion blur. From flowing rivers to wind-blown leaves, every element moves with rhythm and grace.
Water in Motion
Waterfalls, waves, and streams are ideal subjects for slow photography.
Use a shutter speed of 1–4 seconds for silky smooth textures.
Experiment with composition—foreground rocks add stability to flowing water.
Cloud Movement
To capture drifting clouds, use exposures of 30 seconds to several minutes with an ND filter.
The result: soft streaks across the sky that contrast beautifully with static landscapes.
Wind Effects
Leaves, grass, or flowers swaying in the breeze create natural blurs.
Frame them against stable objects (like trees or fences) for visual balance.
In short: water, clouds, and wind each tell a different time story—water flows, clouds drift, and wind dances.
7. Urban Motion Blur: City Lights and Energy
Cities never sleep—and that’s what makes them perfect for motion blur. From headlights to pedestrians, everything moves dynamically.
Light Trails
Nighttime roads become rivers of color when you slow down your shutter.
Ideal Settings: f/8, ISO 100, 10–20 sec.
Compose from elevated points for sweeping light paths.
Crowd Movement
Blend human flow in urban spaces. A 1–2 second exposure blurs people while keeping buildings sharp—creating a contrast between chaos and calm.
Public Transport
Trains or buses in motion add dramatic linear blurs. Use panning for artistic direction.
Reflections
Wet pavements or puddles enhance urban motion photography—lights reflect beautifully in slow exposures.
So, when photographing cities, look for rhythm—movement isn’t random; it’s patterned energy waiting to be seen.
8. Abstract and Experimental Motion Blur
Motion blur doesn’t have to depict reality. You can push it into abstraction and emotion.
Try:
Moving the camera in patterns (zig-zag, rotation, swirl).
Combining multiple exposures.
Using colored lights or reflections.
The goal is not accuracy but emotion—creating imagery that feels like memory or dream.
An intentional blur can evoke mood, mystery, and even nostalgia—turning an ordinary scene into interpretive art.
9. Common Mistakes and How to Fix Them
Every photographer faces challenges when exploring motion blur, and knowing how to correct these issues is key to turning imperfect shots into intentional works of art. One of the most common problems is when the entire frame appears blurry, which usually happens because of camera shake. The best way to fix this is by stabilizing your setup—use a tripod or a remote shutter release to keep the camera steady and prevent unwanted vibrations during long exposures.
Another frequent issue occurs when the subject appears too sharp, lacking the fluidity and motion you intended to capture. This typically means your shutter speed is too fast. To achieve a smoother, more dynamic blur, slow down the shutter speed so that movement can be recorded naturally across the frame.
If your image turns out overexposed or too bright, it’s often due to excessive light entering the lens during a long exposure. To control this, you can attach a neutral density (ND) filter to reduce light intensity, or simply use a smaller aperture (higher f-number) to balance the exposure.
Sometimes, you may notice unwanted noise or grain in your motion blur photos. This usually results from using a high ISO setting, especially in low-light environments. The solution is straightforward—lower the ISO and extend your exposure time to let in more light naturally, resulting in cleaner, smoother images.
Color accuracy can also be affected during slow photography. If your image shows strange color casts, it’s likely due to an incorrect white balance setting. To fix this, adjust your white balance manually to suit the lighting conditions, whether it’s daylight, tungsten, or cloudy light, ensuring true-to-life colors.
Lastly, if your motion trails or light streaks appear uneven or broken, it may be because the movement was interrupted or inconsistent during the exposure. The best remedy is to practice smooth, continuous motion or increase the exposure time slightly to achieve a more fluid and natural blur.
By making these simple yet effective adjustments—stabilizing your camera, choosing the right shutter speed, controlling exposure, minimizing noise, correcting white balance, and mastering fluid movement—you can transform your results from accidental blur into deliberate, expressive imagery that truly captures the art of motion.
10. Compositional Tips for Slow Photography
Composition remains just as vital in motion blur photography as in any other form. It’s about directing the viewer’s eye through movement.
Leading Lines
Use natural or architectural lines to guide motion flow across the frame.
Static vs. Dynamic Balance
Contrast moving subjects (like cars) against still backgrounds (like buildings) for visual tension.
Frame the Flow
Use stationary elements—trees, lampposts, or rocks—as anchors within the motion field.
Use Light Wisely
Bright spots can overpower blur—ensure balanced exposure by controlling highlights.
Foreground Interest
Foregrounds give depth, while the motion adds energy—combine both for immersive images.
In one sentence: balance motion with stillness, use leading lines, control highlights, and give your blur direction and purpose.
11. Motion Blur in Portrait Photography
Motion blur in portraits creates dreamy, surreal, or emotional effects—perfect for conceptual or fashion work.
Static Subject with Moving Background
Ask your model to stay still while background elements move—like traffic or waving fabric. It keeps attention on the subject while expressing emotion.
Moving Subject with Static Background
Let your subject move (twirl, walk, or dance) against a sharp backdrop. It conveys life and movement.
Combining Flash and Blur
Use rear-curtain sync flash—the flash fires at the end of exposure, freezing the subject after the blur trail, creating a “ghostly motion” effect.
Creative Concept
Experiment with light painting, translucent fabrics, or reflections for added dimension.
Motion blur portraits tell stories—of energy, emotion, or transformation—rather than just appearance.
12. Post-Processing Motion Blur Photos
Editing can enhance the softness, mood, or drama in your motion blur shots.
Basic Adjustments
Contrast: Boosts separation between static and moving elements.
Clarity: Lower slightly for a dreamy look.
Exposure & Highlights: Adjust to prevent blown-out lights.
Color Grading: Warm tones evoke calmness; cool tones emphasize dynamism.
Selective Sharpening
Apply sharpening only to static parts to emphasize contrast.
Simulated Motion Blur
In Photoshop or Lightroom, use “Path Blur” or “Radial Blur” filters to extend or simulate motion where needed.
In one sentence: post-processing enhances realism, balances exposure, and adds artistic polish to your captured motion.
13. Smartphone Motion Blur Techniques
Even without a DSLR, smartphones can create impressive motion blur.
Apps for Long Exposure
Use apps like Slow Shutter Cam (iOS) or Camera FV-5 (Android) for manual shutter control.
Tripod and Manual Mode
Mount your phone, lower ISO, and use shutter speeds between 1/4–4 seconds.
Creative Opportunities
Light trails with cars.
Water motion near fountains.
Moving crowds for city energy.
Modern smartphones with computational photography can even stack multiple frames to mimic long exposure results—making motion blur accessible to everyone.
14. Real-Life Examples of Motion Blur Artistry
Let’s explore a few practical and inspiring use cases:
Traffic Trails in a Busy City: 10-sec exposure transforms rush-hour chaos into glowing ribbons.
Waves at Sunset: 3-sec exposure softens the water, creating serenity.
Dancers on Stage: 1/4-sec exposure captures grace and rhythm.
Night Carnival Rides: 5-sec exposure reveals colorful spirals.
Star Trails Over Mountains: 20–30-minute exposure creates celestial circles of wonder.
Each scenario reminds us that time itself can be a brush, and the shutter is your canvas.
15. The Philosophy of Slow Photography
At its heart, slow photography isn’t just a technique—it’s a mindset. In a world that glorifies speed, slow photography encourages observation, patience, and connection.
Capturing motion blur forces you to slow down, study movement, and predict timing. It’s meditative—an art that rewards patience and vision.
As photographers, slowing down helps us see the unseen—the rhythm of waves, the whisper of wind, or the dance of light.
So, beyond the technical mastery, motion blur is about mindfulness. It reminds us that beauty often exists not in the stillness of a frame, but in the gentle blur of life moving by.
16. Final Tips for Perfecting Motion Blur
To summarize, here are quick reminders for mastering motion blur photography:
Stabilize your camera.
Experiment with different shutter speeds.
Use ND filters in bright light.
Focus manually for precision.
Practice different movement directions.
Combine motion with composition for storytelling.
In one sentence: motion blur mastery comes from understanding light, timing, and movement—and merging them into visual poetry.
Conclusion
Motion blur photography is both an art and a meditation. It challenges traditional notions of clarity and perfection by introducing fluidity and imperfection as beauty. Through slow shutter speeds and thoughtful compositions, you can convey energy, time, and emotion—turning ordinary scenes into extraordinary visual symphonies.
Whether you’re photographing a speeding car, a flowing river, or a twirling dancer, remember: motion blur isn’t just about blur—it’s about storytelling.
So, slow down your shutter, open your mind, and let motion paint your masterpiece.
Disclaimer:
This article is for educational and artistic guidance purposes only. Techniques, equipment suggestions, and settings are general recommendations and may vary based on environmental conditions, lighting, and camera models. Always ensure safety when photographing in public or low-light environments.